|
I placed the screens underneath my publicity rig and thoroughly centered and aligned the transparencies on the frames. Remember to position them backwards as this aspect of the body shall be next to the fabric when printing. I used items of glass from photograph frames to carry the transparencies tightly on the body whereas they were being uncovered. For the frame sizes, mild bulbs and distances I used, I had to remedy these for about 1 hour and 15 minutes. To switch my picture to the screens, I printed the designs on transparencies. My designs have been larger than standard eight 1/2x11 paper so I needed to cut up the images across several pages. I assembled the pages by aligning the overlapping photographs and held them in place with clear packing tape. They are more expensive but they are much quicker and simpler to function, to allow them to allow you to to increase your output. Any materials that blocks extremely violet light can be used as the movie, even card stock. However, in contrast to traditional plate-making, these screens are normally exposed by using film positives. Ink is positioned on prime of the screen, and a floodbar is used to push the ink via the holes within the mesh. The operator begins with the fill bar on the rear of the display screen and behind a reservoir of ink. You might want to alternate inside and out of doors of the body to make sure a fair, easy coating. I was either applying too much emulsion, or urgent too much by way of the display screen, or both. By the time I coated the third body I was starting to get a better really feel for how to apply it. Make sure you might have papers or drop cloths down to guard in opposition to any spills. In order to get began, I wanted an image for the shirts. I took our makerspace emblem and added a nifty maker-themed phrase, "What will https://printing.bonestudio.net/ you make today?", and our location and website online address. Since the protection area on all-over prints is so great, we use soft-hand inks. Water-based and/or discharge inks can be used but there are drawbacks to those inks and they don't work with all designs. This type of all-over print starts with a one shade AOP with added commonplace print places corresponding to a full entrance, wrap, full again, etc. The cloth must be pulled tightly enough to eliminate wrinkles and creases, but not so tight the staples rip via. Once you’ve hooked up the material, trim the sides and make sure the staples are totally pressed in in order that they don’t cause the body to wobble when positioned on a flat surface. Put the display screen in a pitch black room for a few hours, letting the emulsion dry utterly . We're going to point out you the means to make your own design and screen it onto whatever you need. You’ll want to block out a few hours, and you may must have a design or brand in mind to print. The photograph emulsion you purchased has instructions that can tell you precisely how long to show your image and how far your lightbulb should be from the display screen. Read the instructions fastidiously to ensure you complete the subsequent steps correctly. After the display screen has dried utterly, you can switch your design onto it. While many people recommend utilizing a lightbox for this step, it's not essential. You can get the job accomplished using an everyday 150-watt light bulb. The use of 110 polyester mesh material works finest for this. Stretch the fabric across the frame tightly and secure it in place using a staple gun.
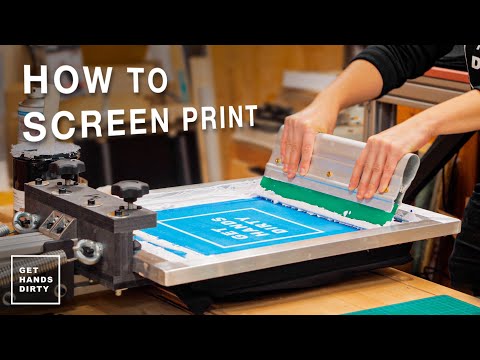
It is greatest to use the spray nozzle out of your sink to pressure out the uncured emulsion. Smaller element areas could require a fine bristled brush or an old toothbrush to clear it away. Be careful on the small areas to ensure you don't scrub away cured material. Check your display screen by looking by way of it towards a lightweight source to ensure the image areas are clear and your edges are clean and clear. This project happened because I wanted to create some t-shirts to find a way to wear and characterize my makerspace at Maker Faire Atlanta. I did not wish to pay the inflated prices online for just some shirts, so I decided I might attempt to make my very own screen prints. As well, display printing works very well with both mild and dark t-shirts. Often, DTG has a tougher time with darkish shirts, however display printing, so long as the right inks are used, will stand out in comparability with another technique for t-shirt customization. We pour the custom ink concoction on prime of it and then use a rubber squeegee to in a quick time move the ink from one end of the silk display to the other. As the ink will get moved over the display, the t-shirt soaks up the ink on the entrance and the design starts to seem. The solely suggestion I even have could be to attempt to keep away from excessively detailed parts in your design. The particulars I misplaced have been as a outcome of I had used a really intricate font with very tiny trace lines. That left very small areas of ink that shall be more likely to put on or wash away. My youth size display screen has a number of letters the place the tiny bits of cured emulsion came off during cleansing, in order that they lose some detail on prints now. Now your display screen is ready to be used in printing shirts. Make sure you place a board or insert inside the shirt to keep away from bleed through. Simply align the screen on the shirt and place some ink throughout the display above your image. Using your squeegee, gently "butter" the ink throughout the picture area the screen but don't press down on it yet. And even when you start with the fundamentals, you’ll have everything you need to customise apparel for yourself, to give as items and even to promote. However, a labor-intensive initial setup means screen printing is most cost-effective when printing in bulk. Fabric display printing ink is greatest for cloth, as a end result of it can be heat set and won’t wash out when laundered. Acrylic screen printing ink is used for different surfaces. Goof Proof® Screen Printed Transfers The quickest and easiest to apply display screen printed switch. Hot Split Retro Screen Printed Transfers Screen printed transfers with a softer feel. Elasti Prints® Screen Printed Transfers Ideal for heat-sensitive, stretchable polyester materials. You can even hold any “mess ups†and use those shirts as test materials for future prints. Use a fine-tip brush to paint in any areas which will have been missed. Firmly hold the screen down with one hand when you scrape the ink across the stencil with the other. Be certain to press hard on the squeegee in order that the entire ink goes via the display screen and through the stencil. You could have to move over the image a quantity of times to ensure a good software of ink. When choosing a warmth press, there are two main options to contemplate. Most individuals begin out with a manual warmth press because they're cheaper to buy. This is an easy machine that has a heated plate that gives the heat wanted to switch your design onto the shirt. You merely lay the shirt on the underside plate and put the transfer paper with the design on top, then push the top plate down and hold it. The mild bulb adapters were plugged into the extension cords within the center of every reflector pan. This whole rig was suspended above my work desk utilizing some sturdy twine. I tied off one side as nicely to anchor the rig and forestall it from drifting or spinning. The easiest way I discovered to tension the display is to pull it taut at the heart of opposite sides of the body and put one staple in the heart of each side. Now repeat that process increasing out from the middle of every facet and slowly work your method to the corners. They are costlier and you should contemplate what sort of images you want to print when deciding between laser and inkjet. Although laser printers are sufficient at printing photos, inkjet printers are better. A lot of people which are new to T-shirt printing find yourself losing money on equipment that they don’t actually need after which neglect some of the most essential equipment. This submit will provide you with a breakdown of all of the most necessary T-shirt printing tools so you presumably can invest your cash in the proper areas and get your small business off the bottom. At Monkey in a Dryer, we are a troop that extends to our neighbors, our vendors, our partners and of course, our customers. Create t-shirt warmth switch designs with no artwork or ability wanted. Utilizing Easy View Online Designer, you'll have the ability to customise any design template in seconds.
0 Comments
Leave a Reply. |
Archives
November 2022
Categories |
 RSS Feed
